Book a Free Call
No commitment required

Whenever I see myself exploring a new language, framework or library, I usually research any relevant information I should know before digging deeper into this new knowledge adventure. Maybe you’re here for the same reason: you’ve been reading lots of tweets from people saying how much they love React, or, likely, you’ve just read an article that stays how React will solve all your problems and other 13 reasons why you should incorporate it in your life, or you’re just tired of the same projects setup with jQuery, and you want to use something new.
After some thinking, you’ve finally decided to try it and start learning, but now you face a problem: you don’t know where to start, what to do first, or what are the best resources available that could help you through this journey. This post will give you some insights about React that you can use as a starting point.
So what do I do first? You ask. From my experience, the best way to know where we are in terms of knowledge is by testing ourselves. It doesn’t matter whether you are a complete newbie or you already have some grasp on the matter. By using a test as a reference, you can be sure of what you know or don’t know and focus on those parts where you are weak. There’s a whole area of learning study that is worth exploring. By the way, I’ve already prepared some tests for you to save some time.
For the following exercises, you should try solving them by yourself before checking the answers. This way, it’s likely that your learning experience might benefit from it. So here we go:
What would display the following log?
const userInfo = {
    username: 'dani',
    email: 'dani@test.co',
    address: {
    city: 'Miami',
    zipcode: '001'
},
    hobbies: ['sing', 'dance']
}

let address = userInfo.address

address.city = 'Boston'

console.log(userInfo.address.city)
Could you tell if this is correct?
const { password: pass} = userInfo


console.log(password)
What about this cool function? What will it return?
const formatString = (format) => {
    return (string) => {

        switch (format) {

            case formatOptions.up:
                return string.toUpperCase()

            case formatOptions.low:
                return string.toLowerCase()

            default:
                return string

        }
    }
}

const toUpperFormatter = formatString(formatOptions.up)

console.log(toUpperFormatter('hello'))
More cool functions...
function sum(a, b) {
    return a + b
}

function executer(cb, ...args) {
    return cb(...args)
}

console.log(executer(sum, 2, 3))
What about this?
const myPromise = new Promise((res, rej) => res('resolved'))


myPromise.then(res => console.log(res))
This seems pretty simple, what would the output be?
const name = 'Dani'


console.log(`Hello ${name}`)
And the last one...
function Greeting(name = 'user' ) {
    return `Hello ${name}`
}

console.log(Greeting())
So? How did it go? do you think it was super easy? if so you’re probably also thinking: ‘Hey! but wait a minute, this is not React!’ and you are absolutely right!
I apologize for tricking you that way. If you struggled to answer the questions and got most of them wrong, I would strongly recommend getting a better understanding of some features from ES6. The main reason is that those are not even the core concepts, and since React is a javascript library, you will use that kind of syntax most of the time. But if you still want to continue, that’s ok too! The examples we are about to see further down are for beginners, and they will help you to get an idea of what React is all about.
One of my favorite things about this library, what I consider a crucial concept that you need to understand when starting with ‘React’ is how it changes the way you think and code. You go from an imperative programming paradigm to more declarative programming. But what does that mean? Let’s look at the definition of each and explain with examples from there.
As your application grows, ensuring your API can handle the increased load becomes essential. In that case, you might consider using a load testing tool for API to simulate traffic and identify bottlenecks.
In short words, imperative programming is a way in which you specify how a program is built by writing every instruction or command needed. For example, Imagine you’re the chef at a restaurant, and want to prepare a cheesecake. So you tell your assistants all the necessary steps to cook it:
1. Grease a 20cm spring form tin.

2. Crush biscuits in food processor and add mixed spice and butter.

3. Line base of tin with foil and brush sides with oil. Press crumbs over base and sides of tin. Place in fridge for 20 minutes.

4. More steps...
In practice, let’s take a very simple form that appears dynamically on a page. Go and create an index.html, our initial code it’s just a div#container:
<body>
    <div id="container"></div>
</body>
To insert a dynamic form using just vanilla javascript, these would be the steps:
 1<!DOCTYPE html>
 2<html lang="en">
 3  <head>
 4      <meta charset="UTF-8">
 5      <title>Vanilla JS</title>
 6  </head>
 7
 8  <body>
 9      <div class="container" id="root"></div>
10
11      <script>
12        const container = document.getElementById('root')
13        const form = document.createElement('FORM')
14
15        const nameFormGroup = document.createElement('DIV')
16        const nameLabel = document.createElement('LABEL')
17
18        nameLabel.setAttribute('for', 'name')
19        nameLabel.innerText = 'name: '
20
21        nameFormGroup.style.marginBottom = '20px'
22        const nameInput = document.createElement('INPUT')
23
24        nameInput.setAttribute('id', 'name')
25        nameInput.setAttribute('name', 'name')
26
27        nameFormGroup.appendChild(nameLabel)
28        nameFormGroup.appendChild(nameInput)
29
30        const emailFormGroup = document.createElement('DIV')
31         const emailLabel = document.createElement('LABEL')
32
33        emailLabel.setAttribute('for', 'email')
34        emailLabel.innerText = 'email: '
35
36        const emailInput = document.createElement('INPUT')
37         emailInput.setAttribute('id', 'email')
38         emailInput.setAttribute('name', 'email')
39
40        emailFormGroup.appendChild(emailLabel)
41         emailFormGroup.appendChild(emailInput)
42
43        form.appendChild(nameFormGroup)
44        form.appendChild(emailFormGroup)
45
46        container.appendChild(form)
47      </script>
48  </body>
49</html>
Which displays:
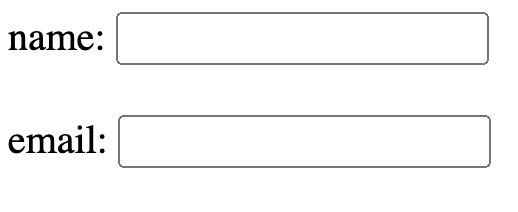
That’s way too much code for just a form with two inputs, so what do you think could happen if the complexity of this form grows? Exactly! that would be a nightmare to maintain. Now let’s visit the declarative way:
On the other hand, in a declarative programming approach, you describe what you want from a program or what needs to be done. For example, you’re at the same restaurant, but this time you’re just a client. Rather than giving commands on how to prepare a cheesecake, you simply order it.
As simple as that, let’s check what it looks like in practice with React. But first, let’s visit some concepts and; special syntax React uses. From the documentation:
Consider this variable declaration:
const element = <h1>Hello, world!</h1>;Another concept of React are Components: reusable UI elements where you can combine your markup, CSS, and JavaScript to build your app.
Returning to our example with the simple form. Create another html file with the following code:
<!DOCTYPE html>
<html>
<head>
  <meta charset="UTF-8" />
  <title>React JS</title>

  <script src="https://unpkg.com/react@18/umd/react.development.js"></script>
  <script src="https://unpkg.com/react-dom@18/umd/react-dom.development.js"></script>
  <script src="https://unpkg.com/@babel/standalone/babel.min.js"></script>
</head>

  <body>
    <div id="root"></div>
  </body>
</html>
That is all you need in your html. Everything inside the “root” will be managed by React. We do it like this:
<!DOCTYPE html>
<html>
<head>
  <meta charset="UTF-8" />
  <title>React JS</title>

  <script src="https://unpkg.com/react@18/umd/react.development.js"></script>
  <script src="https://unpkg.com/react-dom@18/umd/react-dom.development.js"></script>
  <script src="https://unpkg.com/@babel/standalone/babel.min.js"></script>
</head>

  <body>
    <div id="root"></div>

    <script type="text/babel">
        const container = document.getElementById('root');
        const root = ReactDOM.createRoot(container);
    </script>
  </body>
</html>
We get the root element by its ID; we use the React DOM API to create a root. But this is not enough because, before your components display on the screen, they must be rendered by React. Of course, let’s code our component first and explain what rendering means:
Remember, that is not HTML. Again, we’re using JSX to create the Form component, which is a function that returns our form element.
Now we need to tell React that we want to render the Form Component:
 1<!DOCTYPE html>
 2<html>
 3  <head>
 4      <meta charset="UTF-8" />
 5      <title>React JS</title>
 6
 7      <script src="https://unpkg.com/react@18/umd/react.development.js"></script>
 8      <script src="https://unpkg.com/react-dom@18/umd/react-dom.development.js"></script>
 9      <script src="https://unpkg.com/@babel/standalone/babel.min.js"></script>
10  </head>
11
12  <body>
13    <div id="root"></div>
14
15
16    <script type="text/babel">
17
18      const container = document.getElementById('root');
19
20      function Form() {
21          return (
22            <form>
23              <div style={{marginBottom: '20px'}}>
24                <label htmlFor="name">name: </label>
25                <input type="text" name='name' id='name'/>
26              </div>
27
28              <div>
29                <label htmlFor="name">email: </label>
30                <input type="text" name='email' id='email'/>
31              </div>
32            </form>
33          )
34      }
35
36
37      const root = ReactDOM.createRoot(container);
38      root.render(<Form />);
39    </script>
40  </body>
41</html>
In line 38, root.render calls our Form component to figure out what to display on the screen. That’s what’s called “Rendering” which results in the same form we created in an imperative fashion:
Incredible difference, huh? Instead of writing step by step all the instructions you need to obtain a form: getting, creating and updating elements (“how”), you just need to worry about “what” piece of UI you need and let React do the heavy part, which is updating the DOM. That’s incredibly powerful because it allows you to write components with their own logic and think about each piece in isolation, resulting in better scalability, re-usability, maintenance and saving performance costs.
Actually, we could enhance our Form component by creating a smaller one for our Inputs:
function Input({ label, name }) {
    return (
        <div>
            <label htmlFor="name">{label}: </label>
            <input type="text" name={name} id={name}/>
        </div>
    )
}
Components can receive props as parameters, so you can build the same component with many variations. The Input component above accepts a label and name as part of its props. In action, we could use it like this:
 1 <!DOCTYPE html>
 2<html>
 3  <head>
 4      <meta charset="UTF-8" />
 5      <title>React JS</title>
 6
 7      <script src="https://unpkg.com/react@18/umd/react.development.js"></script>
 8      <script src="https://unpkg.com/react-dom@18/umd/react-dom.development.js"></script>
 9      <script src="https://unpkg.com/@babel/standalone/babel.min.js"></script>
10  </head>
11
12  <body>
13    <div id="root"></div>
14  </body>
15</html>
16
17<script type="text/babel">
18
19  function Input({ label, name }) {
20    return (
21            <div>
22              <label htmlFor="name">{label}: </label>
23              <input type="text" name={name} id={name}/>
24            </div>
25    )
26}
27
28
29  function Form() {
30    return (
31            <form>
32              <div style={{marginBottom: '20px'}}>
33                <Input label="name" name="name" />
34              </div>
35
36              <Input label="email" name="email"/>
37            </form>
38    );
39}
40
41
42  const container = document.getElementById('root');
43  const root = ReactDOM.createRoot(container);
44
45  root.render(<Form />);
46</script>
As you can see, we’re now using the custom Input component to build a form with two input elements. Each Input we use has its own label and name props. When root.render calls <Form />, both Inputs are also called, resulting in the same form:
Now we have the freedom to modify the internal logic of our Input component without messing around with the Form. Just like that, every time we want to use the Form component we’ll get the same Inputs, so let’s do a final tweak:
function Form({ title, children }) {
    return (
        <div>
            <h2>{title}</h2>
            <form>{children}</form>
        </div>
    );

}
Along with the title prop, the Form component accepts a children prop. That’s how React lets you nest or compound components. Then:
const App = () => {
    return (
        <>
            <Form title="User Form">
                <div style={{marginBottom: '20px'}}>
                    <Input label="name" name="name" />
                </div>

                    <Input label="email" name="email"/>
            </Form>

            <Form title="Newsletter Form">
                <div style={{display: 'flex'}}>
                    <Input label="email" name="email" />
                    <button>Subscribe</button>
                </div>
            </Form>
        </>
    )
}
We can build two different and independent Forms with their own logic and content as shown above. Components can render only one root element, that’s why we use this special tag from JSX: <> </> to wrap both Forms. Our final code:
 1<!DOCTYPE html>
 2<html>
 3  <head>
 4    <meta charset="UTF-8" />
 5    <title>React JS</title>
 6
 7    <script src="https://unpkg.com/react@18/umd/react.development.js"></script>
 8    <script src="https://unpkg.com/react-dom@18/umd/react-dom.development.js"></script>
 9    <script src="https://unpkg.com/@babel/standalone/babel.min.js"></script>
10  </head>
11
12  <body>
13    <div id="root"></div>
14  </body>
15</html>
16
17
18
19<script type="text/babel">
20
21  function Input({ label, name }) {
22    return (
23            <div>
24              <label htmlFor="name">{label}: </label>
25              <input type="text" name={name} id={name}/>
26            </div>
27    )
28  }
29
30
31  function Form({ title, children }) {
32    return (
33            <div>
34              <h2>{title}</h2>
35              <form>{children}</form>
36            </div>
37    );
38  }
39
40  const App = () => {
41    return (
42            <>
43              <Form title="User Form">
44                <div style={{marginBottom: '20px'}}>
45                  <Input label="name" name="name" />
46                </div>
47
48                <Input label="email" name="email"/>
49              </Form>
50
51
52              <Form title="Newsletter Form">
53                <div style={{display: 'flex'}}>
54                  <Input label="email" name="email" />
55                  <button>Subscribe</button>
56                </div>
57              </Form>
58            </>
59    )
60  }
61
62  const container = document.getElementById('root');
63  const root = ReactDOM.createRoot(container);
64
65  root.render(<App />);
66</script>
The above will display:
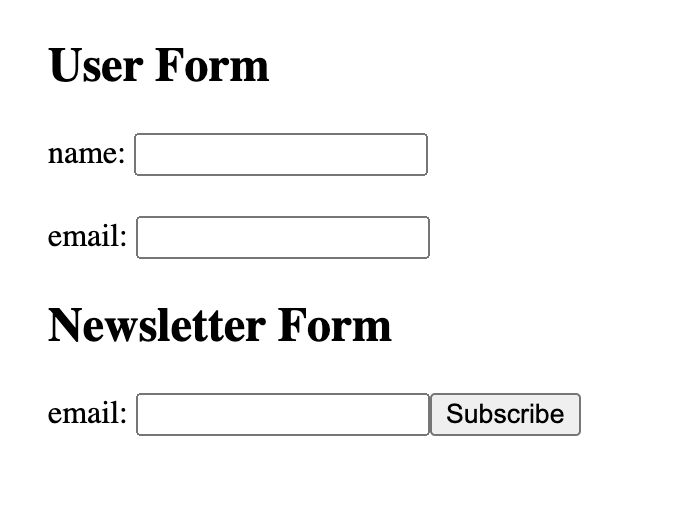
That’s a wrap! It’s always difficult to shift from one mindset to another, and React offers us much more features that would be impossible to cover in one place. That’s why I’ll give you some recommendations and useful resources that will help you to get a better understanding of the library:
React docs: Even though it’s a beta version, the content is 99% finished. It really does a great job explaining with details, examples and exercises all you need to know about the library. My favorite read by far is Thinking in React because it helps you to change your design perspective in just 5 steps.
Pete Hunt: React: Rethinking best practices – JSConf EU: It’s a video from 9 years ago, but it’s still a good reference to understand how React works.
Practice as you learn new concepts: it sounds obvious, but sometimes we fall into the trap of passively reading new information without building a mental model that helps us to get a solid understanding. By practicing with personal projects, writing a post and using many other techniques you will gain more expertise on the matter.
Avoid illusions of knowing: you shouldn’t ‘believe’ you know something, by testing yourself you can really be certain about your progress.