Book a Free Call
No commitment required

In our previous post, we delved into deploying a tip calculator built with Go and HTMX, using docker and Render. This served to establish how seamless and efficient this process can be for Go applications overall using the showcased stack of tools. Now, to further prove that point we’ll be using a different platform today but the same application.
The main concern in mind here is time to market, which is something that at Wawandco we cherish, since it is a factor that helps companies have competitive products that can adapt to the market surrounding them, not only to survive but to thrive.[1]
That being said, this post will be for rolling out TODOx(a to-do application using Go and HTMX) using Digital Ocean as our cloud platform.
Feel free to follow this post as you read through, but bear in mind that you will require a Digital Ocean account and you might run into some costs associated with using their services.
Digital Ocean offers a user-friendly interface and management panel, making it easy to navigate and understand. This platform also provides APIs for automation and integration with third-party tools, enhancing flexibility and efficiency. Additionally, DigitalOcean offers comprehensive guides to assist users through complex setups, ensuring smooth operations. Furthermore, the company provides high uptime guarantees for virtual machines and storage, ensuring reliable service availability.[2]
That being said, let’s look at how we can deploy our TODOx web application using Digital Ocean.
As previously stated, TODOx is the application we will be using for our demonstration. It’s a simple To-Do application that was built using the Leapkit template. For this deployment, we will be using Docker along with a Database instance using Postgres. Those are not the only way to do it but we’ll go with those for the sake of simplicity.
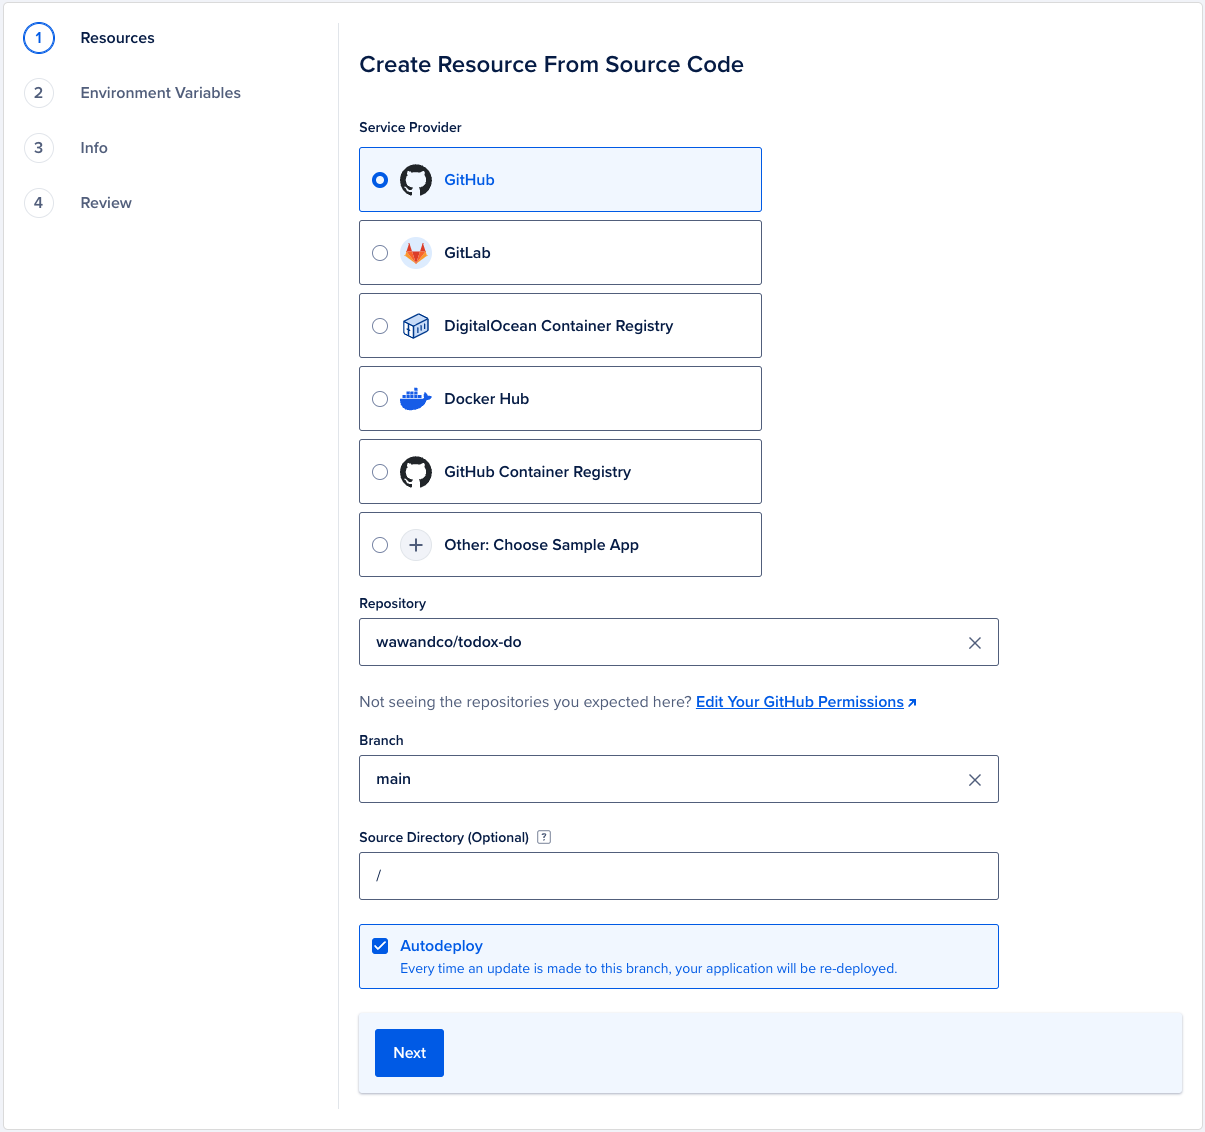
A characteristic of Digital Ocean is its ease of use. Navigating their UI is pretty simple, so connecting our Repository is straightforward. We will grant Digital Ocean access to https://github.com/wawandco/todox-do which is our repository for this drill. For that matter, log into Digital Ocean, go to the App Platform, and click on “Create App”. Digital Ocean has support for GitHub, GitLab, and some image registries such as GitHub Container Registry and Docker Hub.
If you’re already shipping images of your application to a container registry, you might want to consider going with this option since it will save you time and effort by leveraging your existing setup [3].
Next, choose the branch you want Digital Ocean to pay attention to and deploy from. In addition to that, one cool feature it offers is to auto-deploy changes as they get to the target branch of your choosing. This is something that ensures you’re continuously delivering the changes that you’re making on that target branch[4].
In the next section, Digital Ocean will ask you based on its analysis of your codebase, which resources you which to deploy and under what plan. This includes selecting the type of server, specifying the amount of memory and disk space needed, as well as configuring any additional services such as a database, but we’ll get to that part later.
We will go with the basic plan and stick to deploying the service through our Dockerfile. This plan includes an instance with 1 GB of RAM, 1 vCPU of processing power, and 40 GB of bandwidth.
On the next screen, Digital Ocean allows you to set environment variables to configure your application. Digital Ocean comes equipped with the ability to handle secrets by just enabling the encrypt checkbox. We will be configuring a few ones later for connecting our application with the database.
Finally, inside the info section, Digital Ocean allows you to configure your application’s name and even modify the region you want to have it running on. For the sake of simplicity, we’ll stick to the default settings for this run.
Last but not least, you’ll see the review page where you can double-check all the settings and configurations you’ve made before deploying your application, along with a breakdown of the cost of running the selected setup. Once you hit the Create resources button, Digital Ocean will start building the application’s image based on the Docker file in our source code to then deploy such an image in a container.
Now, while waiting for Digital Ocean to deploy the application, let’s dig into a subject that’s part of Digital Ocean’s armamentarium for establishing the health of containers.
By default, Digital Ocean tries to perform a health check with your application’s container via TCP to ensure that it’s running correctly. This operation can also be performed via HTTP if you prefer to have more control over what happens as part of that operation.
This can be achieved by adding an endpoint on your server that returns a 200 HTTP status code when accessed. Here’s what our health check endpoint looks like in our application:
func Check(w http.ResponseWriter, r *http.Request) {
	w.WriteHeader(http.StatusOK)
}
Then, we only need to tell Digital Ocean about our endpoint by going to the settings, selecting our component(the service we rolled out), editing the Health Check section, switching it to HTTP, and providing the endpoint URL.
Updating the configuration of our application as we’re doing now, will result in another deployment of our application, so, while we’re at it, let’s go ahead and update the port of our application to 3000 since that’s the one we’re using by default.
At this point, if you access the application by hitting the live App button on the overview page, you’ll get an error and this makes sense since we haven’t created our database yet. So, let’s take care of that next.
Let’s head over to the Database section on the left panel. Once there click on Create Database Cluster. Here you can set all the resources you’ll be using for your database, such as the Engine, Processor, Disk type and size, and the plan for your database.
For this demo, we will be using Postgres 13 with a basic plan which includes 10 GB of disk space, one shared CPU core and 1 GB of RAM.
Postgres isn’t the only option that Digital Ocean supports, it also supports MongoDB, MySQL, Redis, and Kafka.
Now, once you hit the create button, Digital Ocean will begin the provisioning process of your database, which is likely to take about 5 minutes to complete.
While we wait for the provisioning to be completed, let’s adjust who has access to the database to give ourselves and the application access to the database.
This bit is pretty straightforward, just go to the Settings and then to Trusted sources, and hit the edit button. Click the dropdown and you’ll see both your IP and the application as options to select, in this case, we’ll select both since we’ll be running a migration on the database and need the app to save the todos we will be creating from our application.
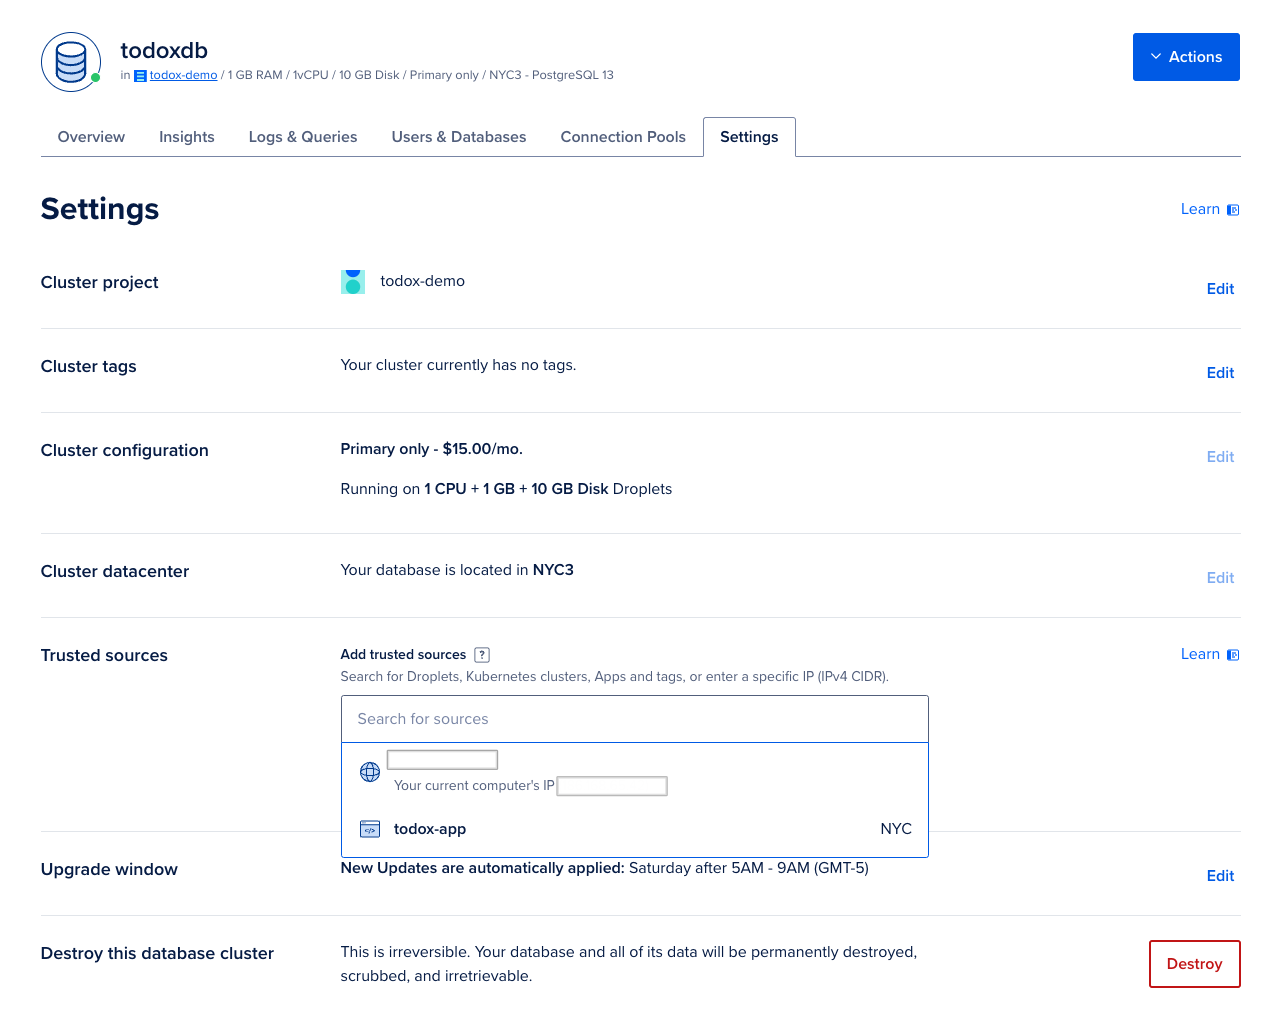
With this, we’re commanding Digital Ocean to only accept connections to the database coming from the selected entities alone, which is ideal for security purposes. Having proper control over database access is important to shield its integrity and protect it from human error.
Once we’re done with that, let’s connect to our database to run the following SQL on it. We can achieve this by going to the Overview tab once again, locating the connection details section on the screen, selecting the Flags option from the dropdown, and then copying the command shown there, which should be similar to the following one:
$ PGPASSWORD=YOUR_PASS psql -U [user] -h [DO_DATABASE_HOST] -p [PORT] -d [DB_NAME] --set=sslmode=require
Then, run the following SQL to create the table our application will use:
CREATE TABLE IF NOT EXISTS "todos" (
    "id" TEXT PRIMARY KEY,
    "content" TEXT NOT NULL,
    "completed" bool NOT NULL DEFAULT '1'
);
We’re ready for the last step now, which is updating the application’s env variables to connect to the database. Let’s take care of that.
From the overview page of our Digital Ocean, let’s grab the connection details in the shape of a connection string. Then, head over to the App Platform section and select the todox application we created recently. Once there, go to the settings tab and select the web service. Scroll down to the environment variables section and click on the edit button.
We will be adding two variables: DATABASE_URL and DATABASE_DRIVER. We encourage you to hit the encrypt checkbox to store the Database URL you just copied as a secret since this corresponds to sensitive information. As for the driver, we will be using postgres.
Once we save those variables, a new deployment will start and as soon as that’s done our application will be ready to go!
Digital Ocean is certainly an easy-to-use platform that provides a convenient way to deploy applications. It also includes other features that were out of the scope of this post but are worth calling out, such as Billing alerts, basic monitoring, scaling options, a CLI to manage your resources, alert policies that notify you via email or Slack, and last but not least a zero-downtime mechanic that automatically rolls back to the previous working version of your application if your new deployment fails.
Stay tuned for our next post, where we’ll be using a different platform to deploy our Go application, further expanding our options and exploring different strategies for optimal deployment.