Book a Free Call
No commitment required

TL;DR: We migrated a production Go application from PostgreSQL to SQLite using Fly.io volumes. The results: 100% success rate (vs 95.33% with PostgreSQL) and mean latency dropped from 4.668 seconds to 6.474 milliseconds. SQLite’s serverless architecture eliminated complexity while improving performance. This post covers the migration process, performance benchmarks, and lessons learned.
Key Results:
Last updated: March 2026
Database migration is the process of migrating data from one or more source databases to one or more target databases by using a database migration service. When a migration is finished, the dataset in the source databases resides fully, though possibly restructured, in the target databases[1].
A well-designed database migration requires multiple steps and, often, complex data transformations[2].
In this post, you will learn about the migration process, including the reasons for the migration, the steps involved, and the performance comparison between the two databases. You will also discover how to remove PostgreSQL from the app and set up Fly.io to deploy the migration.
Most SQL database engines are implemented as a separate server process. Programs that want to access the database communicate with the server using some kind of inter-process communication (typically TCP/IP) to send requests to the server and to receive back results. SQLite does not work this way. With SQLite, the process that wants to access the database reads and writes directly from the database files on disk. There is no intermediary server process[3].
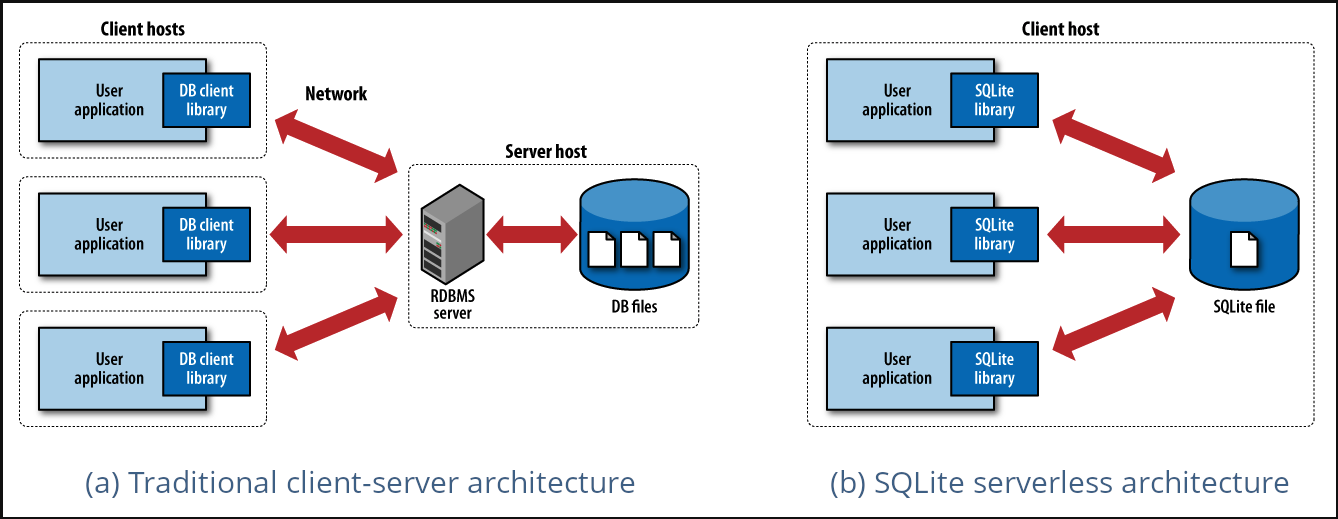
Image taken from How’s SQLite different from traditional databases?
By eliminating the server, SQLite eliminates complexity. There’s no need for multitasking or inter-process communication support from the OS. SQLite only requires read/write to some storage[4]. Giving us the opportunity to compact our stack by having our database directly within our application.
The performance of the database was a significant factor in our decision. In order to compare the performance of both databases, we conducted a load test using the vegeta tool to send a GET request to an endpoint that loads a significant amount of data.
The results of the test are as follows:
echo "GET https://a036-181-235-90-157.ngrok-free.app/c/281d3fe0-8a4d-44c7-af3e-fa6b02ededbd" | vegeta attack -duration=3s | tee results.bin | vegeta report
Requests      [total, rate, throughput]         150, 50.35, 14.22
Duration      [total, attack, wait]             10.059s, 2.979s, 7.08s
Latencies     [min, mean, 50, 90, 95, 99, max]  175.991µs, 4.668s, 5.939s, 6.971s, 7.08s, 7.141s, 7.179s
Bytes In      [total, mean]                     8343764, 55625.09
Bytes Out     [total, mean]                     0, 0.00
Success       [ratio]                           95.33%
Status Codes  [code:count]                      0:7  200:143
While PostgreSQL handled the load well overall, its higher latencies suggest potential scalability concerns under heavier traffic conditions.
echo "GET http://localhost:3000/c/30ab2901-b920-4f4d-be4f-09b761108213" | vegeta attack -duration=5s | tee results.bin | vegeta report
Requests      [total, rate, throughput]         250, 50.21, 50.14
Duration      [total, attack, wait]             4.986s, 4.979s, 6.632ms
Latencies     [min, mean, 50, 90, 95, 99, max]  5.155ms, 6.474ms, 6.071ms, 7.519ms, 8.319ms, 15.695ms, 16.507ms
Bytes In      [total, mean]                     18774250, 75097.00
Bytes Out     [total, mean]                     0, 0.00
Success       [ratio]                           100.00%
Status Codes  [code:count]                      200:250
SQLite demonstrated excellent performance, particularly in terms of low latencies and perfect request success rate. This makes it an interesting choice for applications with latency requirements or those that prioritize simplicity and reliability.
The initial step involved safeguarding our PostgreSQL database by creating a backup using pg_dump to generate a .sql file containing all the PostgreSQL data.
pg_dump --data-only --inserts -h localhost -U username database_name > /path/usr/backup.sql
This approach was chosen because our database wasn’t very large, with only 16 tables and not many records. However, the backup process can vary depending on the size of our database, and this approach may not be scalable for larger databases with more tables and records.
We encountered the need to translate PostgreSQL syntax such as ILIKE and array_agg to SQLite equivalents. Instead of using ILIKE, we used the LIKE operator, which is the SQLite equivalent. Additionally, we had to translate array_agg to the SQLite GROUP_CONCAT function.
Our application is hosted on fly.io, but we had a PostgreSQL database engine that was responsible for managing the database.
Given that SQLite databases are self-contained files[5], if we were to deploy our project with the database in the root of the project, the database would be included in the Docker image. This means that every time we deploy, the database would be restored with all the data, which is not ideal.
Fly volumes are local persistent storage for Fly Machines. You can access and write to a volume on a Machine just like a regular directory. Use volumes to store your database files, to save your app’s state, such as configuration and session or user data, or for any information that needs to persist after a deployment or restart[6].
On Fly.io, you can create a volume by running a simple command in the terminal.
fly volume create volume_name --region mia -n 1 -a application_name
In this command:
volume_name is the name you want to give to the volume.mia is the region where the volume will be located.1 GB is the amount of memory allocated to the volume.application_name is the name of the application.
Once we created the volume, we can find it in the volumes section.
To attach the volume to our application, we needed to make some adjustments in our fly.toml file. Here’s how we did it:
app = "releaso"
primary_region = "mia"

[env]
  GO_ENV = "production"

[mounts]
  source = "releaso_volume"
  destination = "/data/db"

[http_service]
  internal_port = 3000
  force_https = true
  auto_stop_machines = true
  auto_start_machines = true
  min_machines_running = 0
By including the volume details under [mounts], we are indicating where the volume should be connected within our application.
We needed to adjust our environment variable used to establish the connection to the SQLite database. In our case, the updated database URL would now be:
DATABASE_URL=file:///data/db/my.db
This modification ensures that our application can access the SQLite database file stored in the designated volume location for database operations.
To run the migrations before, we were using the release_command. This is useful for running database migrations before app Machines are created or updated with the new release[7].
The temporary machine has full access to the network, environment variables and secrets, but not to persistent volumes. Changes made to the file system on the temporary machine will not be retained or deployed. The building/compiling of your project should be done in your Dockerfile. If you need to modify persistent volumes or configure your application, consider making use of CMD or ENTRYPOINT in your Dockerfile[7].
CMD /bin/db migrate; /bin/app;
By adding those commands to our Dockerfile, the migrations will run before starting the application.
Once our setup was completed, we deployed the app by running the following command in the terminal:
fly deploy -a app_name --config fly_config_file_name.toml
After deploying the app, we noticed that it was running successfully when we saw the message that the migrations had completed and the server had started.
app mia [info] level=INFO msg="executing command: /bin/db [migrate]"

app mia [info] ✅ Migrations ran successfully

app mia [info] level=INFO msg="starting background subprocess: /bin/app []"

app mia [info] waiting for signal or subprocess to exit

app mia [info] Server started at 0.0.0.0:3000
Migrating our Go application from PostgreSQL to SQLite was a great decision that allowed us to simplify our development process and improve overall efficiency. By eliminating the need for an intermediary server process, we were able to compact our stack and have our database directly within our application.
However, we encountered the need to address certain limitations that come with using SQLite. One of the most significant limitations is the inability to perform backups and recoveries for the database. To address this, we discovered two useful tools: LiteFS - Distributed SQLite and LiteFS Cloud.
In our next post, we will dive into how we implemented these tools in our application and the benefits we experienced as a result. Stay tuned.
Wawandco Engineering Team — We’ve been building and optimizing Go applications for 12+ years, with deep expertise in database architecture and performance tuning. This migration was performed for Releaso, one of our internal tools.
Have database performance challenges? Let’s discuss your architecture or check out our other database optimization articles.